If you’re sitting in an office chair that’s seen better days, you might be thinking it’s time for a change. But before you toss it out, let’s talk about reupholstering.
One thing to keep in mind is that if you do reupholster your chair, it will void your warranty.
It’s not just about saving money. Some people reupholster a chair for many reasons, including:
- Customization of their workspace or match it to the decor of their office.
- Reduce waste and help the environment by breathing new life into a chair.
- Repair a favorite damaged chair they don’t want to let go of yet.
Let’s dive into how you can give that old chair a new lease on life.
Reupholstering Your Office Chair The Right Way
The cost to reupholster an office chair can vary, but if you already have the tools, you should only need to pay for the fabric costs.
STEP 1 Gather the Necessary Tools and Materials

- The new fabric: Simple, cotton-based fabrics work best for these upholstering projects. If you want to use leather, that’s entirely up to you. Just make sure it’s flame-retardant material and doesn’t stain easily.
- A screwdriver set: If you have an electric drill or similar device that you can use as a screwdriver, this will work even better for a DIY reupholstering office chair project. But the screwdriver head must match the bolts or screws that you see on the underside of your office chair. You may need to switch out to wrenches, pliers, or sockets if necessary.
- Pliers: Needle-nose is probably best here; you’ll be surprised how much you will use them.
- Scissors and a boxcutter: Both come in handy when cutting your fabric.
- A professional staple gun: You need some heavy-duty staples for this project, so don’t skimp out and try to use the office stapler to reupholster an office chair.
- Space: You need some space to work with here, so clear off the floor and get ready to work. A protective sheet is a good addition as well.
- A protective, light foam layer: If your chair is a little hard and you want to add some more padding, consider buying a padding layer along with new fabric.
STEP 2 Take Your Chair Apart
- First, does your chair have arms? If it does, unlatch or unscrew the armrests first and get them out of the way.
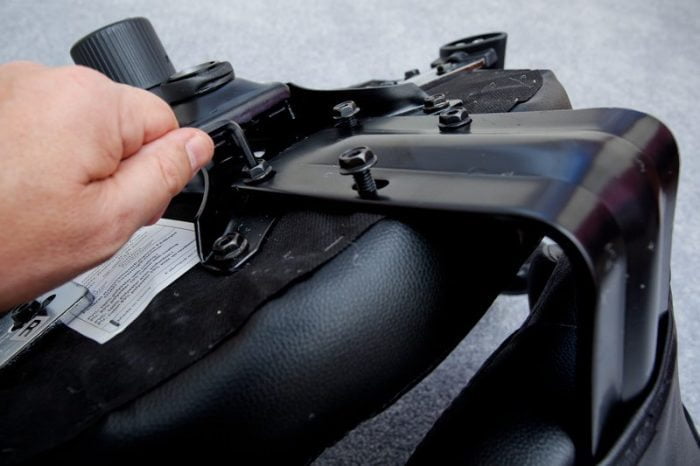
- Next, flip your chair upside down and look for the bolts or screws that secure the base to the “seat” of the chair. You will need to detach the base fully to work on upholstering the chair. It’s best to do this by unscrewing all attachments at once and lifting the base fully off the seat cushion.
- There are many different chair designs, and for some, you will have to detach the back of the chair at the same time as the base.
- After this step is done, you should have the back and seat of the chair, typically covered by a plastic base or framework of some kind. You will need to remove this next, so look for deep-set screws and get ready to work, because these screws are typically driven deep into the wood framework within the chair (we told you electric tools may come in handy).
Keep careful track of all screws and go very slowly when necessary so that you don’t strip any bolts or damage any of your framework materials.
You can also photograph every step of the disassembly. These pictures are your reassembly guide.

Unscrew the shell-like base from the bottom of the seat and, if necessary, the back of the chair. If everything has gone correctly, then this should expose the (usually) wooden surface that’s used as a brace for the chair padding and fabric. There is typically a wood base for the seat and for the back, which should be separated at this point. The upholstery should be stapled with a vigorous circle of staples or fasteners at the edge of this base.
Note: Some office chairs have fabric “buttons” inset. You can usually remove these buttons and even cover them with spare fabric pieces so that everything matches. However, be careful – chairs that include fabric buttons aren’t always easy to reupholster since their original layer of fabric may not come off easily.
STEP 3 Remove the Staples and Strip Away the Old Upholstery

Do you see those staples? It’s time to get rid of them. Bring out the needle-nose pliers and start pulling the staples out. Depending on how the chair was manufactured, these staples could range from many small staples to several large metal fasteners. Either way, pry them out carefully and try to avoid damaging the wood beneath. For smaller staples, the pliers are an ideal tool, but you may find a heavy-duty staple remover better for larger fasteners.
Grab a bag or box to put the old staples in once you worm them out, and work your way from corner to corner of the seat.
At each corner you will see that the fabric is folded over itself to form a tight fit. Unfold the fabric carefully as you go and spread it out. When you are finished, you should be able to pull the old upholstery off the seat. You should see that a simple foam layer or protective covering is all that’s left. When you are finished, do the same to the back of the chair if necessary.
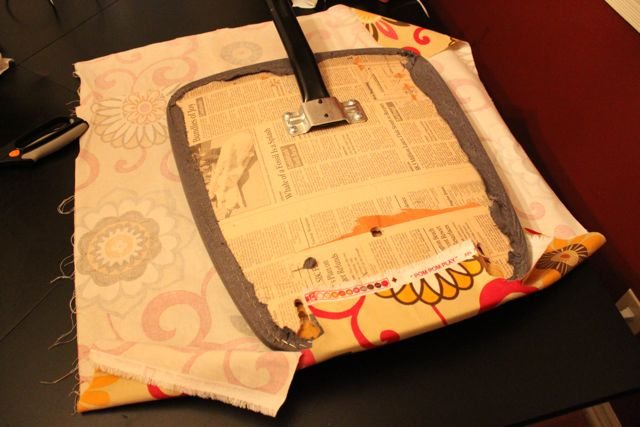
STEP 4 Place and Cut The New Upholstery Fabric
Take your fabric and position it underneath the seat, with the wood backing facing upward. If you have a foam layer to install, do this with the foam layer first! Fold the fabric around the seat for some measurements – it doesn’t have to be exact, but you should have enough fabric for four inches along the edges of the wood base. Once you have enough, cut your fabric.
STEP 5 Attach the New Upholstery
This is easily the most difficult step. Because of the awkward shape of most seats and office chair backs, the fabric will not fold neatly around the base. The most important tool that you have for this process is patience.
Fold the fabric layer up and around the back of the seat. Slowly attach it, alternating sides to keep the fabric as smooth and flat as possible. Leave the corners for last. If you have a glue gun or similar adhesive option, you may want to attach the fabric with a little glue first before stapling it down.
When you reach the corners, try to imitate the folds that you undid in the old upholstery. Use “triangle” folds that wrap the fabric tightly around the corner, a little like wrapping a Christmas present. It’s a good idea to leave a little bit of give – if you pull the fabric too tight, it can create wrinkles and other problems up front. If you used glue, now is the time to leave the project for a while and wait for it dry.
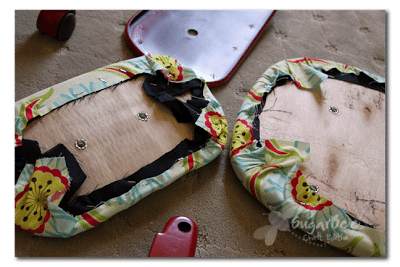
Once you have worked the fabric into a smooth fit, use your staple gun and fasten the fabric down with a line of staples at least every inch or so. There are other options, such as fabric tacks, but heavy-duty staples tend to work best here. If there are a lot of leftover folds of fabric dangling from the base, then cut it out with your scissors so the fit is smooth.
STEP 6 Reattach the Backing to Your Chair
Now it’s time to return the back to your chair with those screws that you carefully preserved. For some office chairs, you may have the option to cover these backs (usually the non-plastic kind) in upholstery as well so that everything matches, but it isn’t always necessary. Again, it’s fine to tweak your plans to fit the unique design of your office chair, since they’re all a little different.
If you have to place screws directly through your new fabric covering, don’t worry about it – just poke a hole and keep going. Remember that the fit may be a little different with new upholstery, so go slowly and make adjustments as needed.
STEP 7 Continue the Process as Needed with the Other Chair Components
Specifically, if your armrests also have fabric on them, you may want to replace this upholstery as well. Fortunately, it should be just like a smaller version of the project you just did. So start unscrewing the armrests from their base and carefully peel back their fabric: They may not fully detach the way that the seat did!
Detachable neck or headrests are more complicated, since they may come with fitted fabric sleeves that are harder to replicate. You can decide if you want to tackle this project to make sure everything matches or not.
This is also the place to consider if you want to change anything else, such as casters or the color of the base, which you can update with a thorough (and careful) spray paint project. Take your time, and make sure everything is just the way you want it before you move on. Perfectionists tend to spend a lot of time on this step.
STEP 8 Put the Office Chair Back Together Again
If the seat and back of the office chair are still in separate pieces, attach them again before moving on. Then attach the wheeled base of the chair (this doesn’t work as well if you switch up the order). Reverse the steps you used in the deconstruction and replace all bolts and screws as necessary. Test components to make sure they are safely connected, sturdy, and at the right angles.
As long as you go slowly and make sure you have all the necessary pieces together, this step should be pretty easy. Once you put back the best seat cushion and when the chair is returned to its old form, set it down and test it out! Check for any loose pieces or weird angles that may need further readjustment. If there are any annoying fabric wrinkles, see if you can tuck them back into the depths of the chair. In the future, it’s a good idea to avoid wearing pants with metal buttons or other objects that can rip your new fabric while using your office chair. Now is also a good time to learn how to keep your chair clean from anything that may come up, like getting out cat pee, removing a blood stain, or even clearing hair out the wheels.