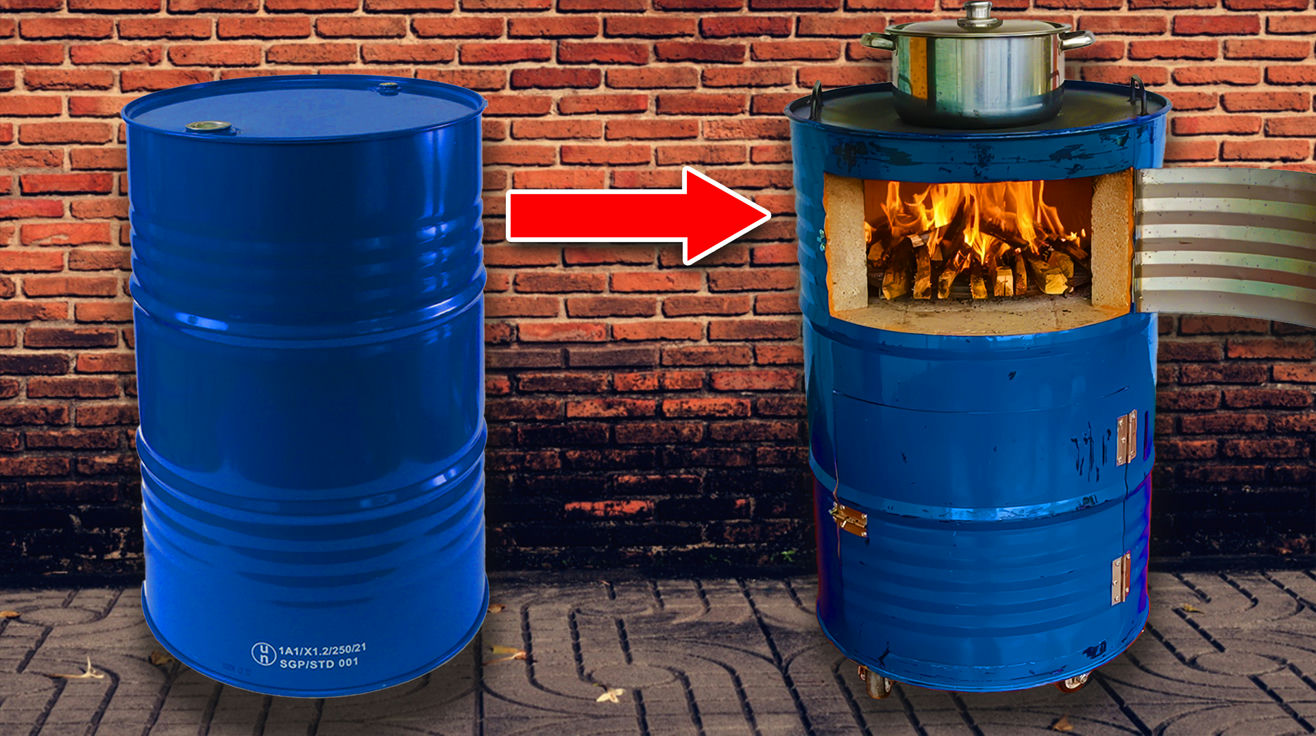
Remember when survival games taught us to convert random junk into useful tools? That’s exactly what this barrel stove project delivers in real life. A 55-gallon drum transformation puts homeowners squarely in control of their heating destiny, slashing winter expenses by $500-1,000 compared to factory-built options. The technology isn’t new – people have been hacking steel drums into heat sources for generations – but the results remain impressive in 2025.
This steel workhorse produces 30,000-40,000 BTUs hourly, enough to warm 1,000 square feet when the temperature drops to ridiculous levels. Plus, builders gain hands-on experience with metal fabrication that transfers to countless other projects. The heating equivalent of jailbreaking your phone, barrel stoves represent that sweet intersection of sustainability, affordability, and pure DIY satisfaction.
Disclaimer: Some images used for commentary and educational purposes under fair use. All rights remain with their respective owners.
Materials Needed

The parts list won’t overwhelm a workbench or wallet. Start with a 16-gauge steel drum – essentially a blank canvas that safely contains actual fire. Hardware for assembly includes 12-15 quarter-inch bolts with matching nuts and washers, the fasteners that prevent the creation from becoming an unintentional fireworks display.
Necessary additions include 3-4 feet of 6-inch diameter stove pipe, a proper adapter collar, a handful of fire-resistant bricks, high-temp silicone sealant, two robust door hinges, and one sturdy latch mechanism. For enhanced durability, 1200°F-rated heat-resistant paint makes a worthwhile investment. Smart builders hit up scrapyards and marketplace apps first – why shell out $60-100 for a pristine drum when recycled ones run $15-30? That weathered patina isn’t just cheaper; it adds character, much like vintage tech somehow looks cooler than its modern counterparts.
Tools Required

The tech stack for this build starts with safety gear – no exceptions. Welding gloves, proper safety glasses, and a respirator rated for metalwork fumes form an essential protection suite. Consider them the ultimate firewall against the very real dangers of metal fabrication.
Hardware requirements continue with an angle grinder (the delete key of the physical world), metal shears for precision cuts, and ideally some welding equipment – a basic MIG welder serves perfectly for beginners. The toolkit rounds out with a tape measure, level, drill, and metal marking implements.
Step 1: Preparing the Drum

Safety protocol initiates with thorough decontamination. That innocent-looking drum might have transported anything from olive oil to industrial solvents, so a comprehensive cleaning with degreasing soap and hot water isn’t optional. For mystery drums with unknown histories, the nuclear option works best: fill with water, add a cup of baking soda, and let it sit overnight to neutralize chemical remnants that could become airborne hazards when heated.
Once sanitized, the transformation begins. Marking the door location about 4-6 inches from the bottom provides optimal positioning for loading wood and managing airflow. Cut a precise 12×12-inch opening using an angle grinder, then create a 6-inch hole in the top center for the exhaust stack. Taking time to smooth those razor-sharp edges with a file prevents the blood sacrifice that primitive tech projects often demand. These operations should always happen outdoors or in workshop spaces with industrial-grade ventilation – metal dust and fumes represent invisible system threats respiratory hardware wasn’t designed to process.
Step 2: Creating the Door

The door component requires surgical precision. Cutting a 14×14-inch section of 14-gauge steel creates an essential 1-inch overlap around the opening. This oversized approach works exactly like smartphone screen protectors – extending beyond the critical area ensures complete coverage where it matters most.
Position two heavy-duty hinges on the left edge – one three inches from the top, another three inches from the bottom – and secure them through welding or bolting to both drum and door. The right side needs a tension-creating latch mechanism that pulls the door firmly against the opening. For temperature regulation, a 2-inch hole near the bottom with a fabricated sliding cover works like a camera aperture, controlling oxygen flow to the combustion chamber. This seemingly simple vent functions as the primary interface for heat output – the analog equivalent of a processing throttle control. Before proceeding, test the door operation repeatedly; it should swing smoothly but seal completely when closed, with zero wobble tolerance.
Step 3: Installing the Stove Pipe

The exhaust system installation represents the most critical safety configuration. Attach a 6-inch stove pipe adapter to the pre-cut hole, applying high-temperature silicone sealant generously around the connection points. This creates a gasket-like seal that prevents toxic combustion gases from escaping into living spaces – an essential containment protocol.
Clearance requirements aren’t suggestions; they’re mandatory safety parameters. Maintain minimum 18-inch distances from walls and 36-inch separation from ceilings. When penetrating building barriers, install insulated chimney thimbles designed specifically for fire prevention. The chimney extension must reach at least three feet above roof penetration points and stand two feet taller than any building section within ten feet. These dimensions create optimal draft conditions while preventing smoke recirculation during wind events – essentially establishing the perfect exhaust runtime environment that keeps home atmospheres separate from combustion byproducts.
Step 4: Adding the Legs

The support structure demands serious engineering consideration. A fully-loaded stove weighs between 200-300 pounds – roughly equivalent to a medium-sized motorcycle – and requires stability under dynamic operating conditions. Four 6-8 inch sections of 2-inch square steel tubing or angle iron serve as the foundation.
Position these legs at quarter-points around the drum’s circumference, approximately 4-5 inches inward from the edge. Welding requires full-penetration connections that distribute weight evenly; bolted installations need 3/8-inch hardware with large washers on both sides to prevent stress concentration and pull-through. Once assembled, stability testing from multiple angles and verification of perfect horizontal alignment with a level tool ensures even heat radiation patterns and prevents operational hazards from shifting weight – essentially calibrating the system for optimal performance metrics while eliminating physical instability variables.
Step 5: Firebox Construction and Baffle Placement

The internal architecture transforms a basic drum into a sophisticated heating appliance. A grate system approximately four inches from the floor facilitates ash separation and maintains consistent oxygen flow beneath the fuel load. This component can be fashioned from 1/2-inch steel rebar in grid configuration or repurposed from cast iron grates salvaged from obsolete cooking equipment.
The efficiency breakthrough comes from proper baffle installation – the thermal equivalent of installing a custom processing chip. A 16×24-inch section of 16-gauge steel, formed into a slightly curved deflector and positioned six inches below the exhaust port, works perfectly. Secure it with brackets welded to the interior wall. This modification forces hot gases to travel a longer route before exit, extracting maximum thermal energy transfer to the space. The resulting 25-30% efficiency gain significantly reduces fuel consumption while minimizing particulate emissions – essentially overclocking heat production while reducing environmental impact and extending runtime between refueling cycles.
Safety Considerations
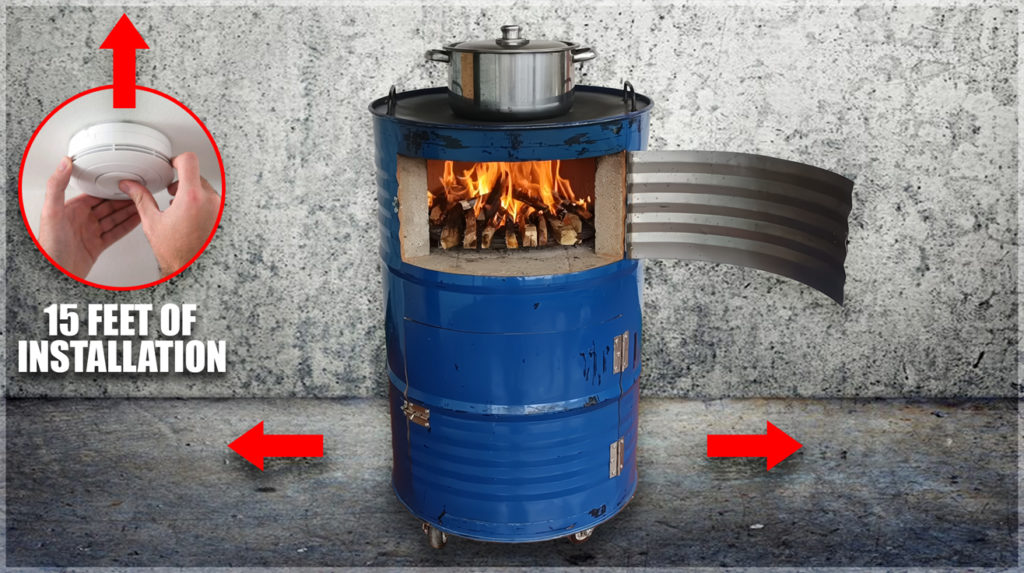
The security protocols for wood stove operation leave zero margin for compromise. Install a carbon monoxide detector within 15 feet of the installation and verify its functionality monthly through test button activation. This essential safeguard provides early warning against the invisible, odorless threat that bypasses human detection systems completely.
Fuel selection critically impacts both performance and safety. Use exclusively dry, seasoned hardwood with moisture content below 20% – properly cured wood produces a distinctive hollow sound when pieces contact each other. Avoid painted, treated, or manufactured wood products that release toxic compounds during combustion. Maintain clearance zones religiously: 36 inches from sides/back, 48 inches frontal clearance, and 18 inches beneath the unit. Regular maintenance prevents dangerous creosote accumulation; inspect and clean the chimney system every 2-3 months during heavy use periods. Chimney fires reach temperatures exceeding 2000°F – hot enough to compromise structural materials and initiate catastrophic building fires within minutes.
Additional Tips and Modifications

Performance optimization opportunities exist for enthusiasts willing to implement advanced modifications. Installing a secondary air intake at the upper rear portion creates a dual-combustion environment that ignites otherwise wasted wood gases, boosting thermal efficiency by up to 30% while dramatically reducing emissions – similar to how hybrid vehicles recapture energy that traditional engines waste.
Thermal storage enhancements come from lining the lower third with fire bricks, creating a heat reservoir that continues radiating warmth hours after active burning stops. Multi-function capability emerges by adding 20 feet of 3/8-inch copper tubing around the upper drum section, connected to a small reservoir tank. This passive system heats 5-10 gallons of water to approximately 120°F during normal operation, providing utility during power outages or reducing conventional water heating expenses. Chimney optimization requires finding the sweet spot between sufficient draft and minimal heat loss; 10-12 foot height with 6-inch diameter typically delivers ideal airflow characteristics while preventing backdraft incidents during adverse weather conditions.