Calibrating the picture is an essential step to making your display appear as close to the original content as possible. Even with the highest-rated TVs in the market, you should still calibrate them to get the best home theater experience. Fortunately, anyone is capable of calibrating their TV with the proper instructions.
STEP 1 Select the Right Picture Mode
- Start with the picture mode, which impacts the overall picture quality.
- Common modes include Standard, Movie, and Dynamic, but Movie or Custom modes are often recommended for the most natural colors.
- For gaming, consider using ‘Game’ mode to reduce input lag.
- Make sure you disable all image manipulation features such as the Soap Opera effect or Black Frame Insertion. Unless you are using a console or watching sports, these features will affect the image quality. Different TV brands will have various names for their image manipulation features.
STEP 2 Adjust the Backlight
- The backlight setting controls the brightness of the LEDs in LED TVs, affecting the picture’s brightness.
- Adjust this setting based on your room’s lighting conditions and personal preference. Increase the TV backlight when in a bright room and lower it in a dim room.
- For OLED TVs, adjust the ‘OLED Light’ or ‘Brightness’ setting, but avoid maximum settings for SDR content to prolong the TV’s life.
STEP 3 Set the Brightness Correctly
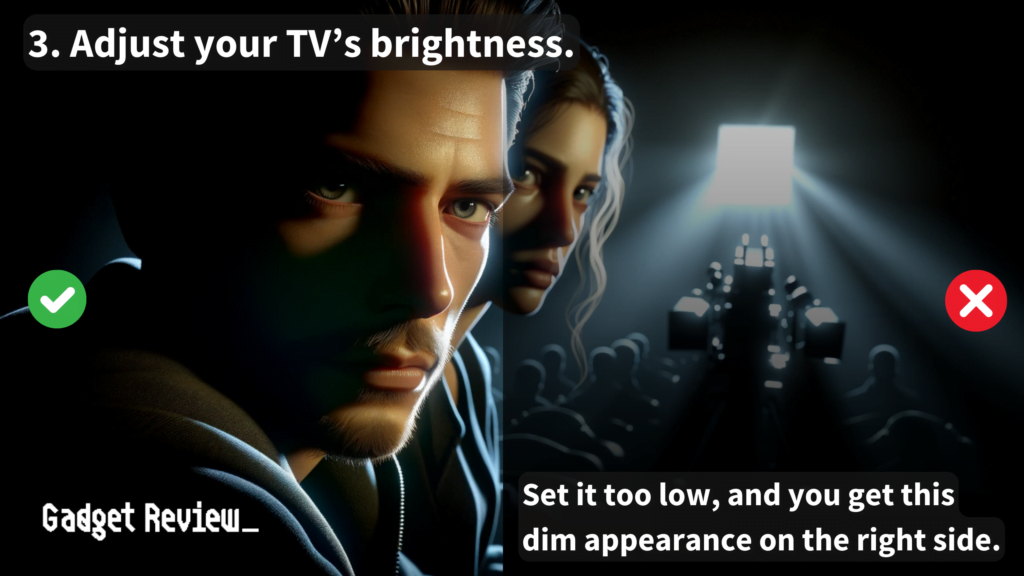
- The brightness setting adjusts the black levels on your TV.
- Set it too low, and you’ll lose detail in dark scenes; too high, and blacks will appear grey.
- Most TVs have this set correctly by default, so it’s often best left as is.
STEP 4 Fine-Tune the Contrast
- Contrast affects the detail in bright images.
- Adjust the contrast so that you don’t lose detail in bright areas without making the image look dull.
- The default setting is usually sufficient, but you can increase it to the maximum if there’s no loss in detail.
- The goal is to get the maximum black while ensuring all the black bars remain visible.
STEP 5 Sharpen the Image
- The sharpness setting defines the clarity of objects.
- Over-sharpening can create unnatural outlines, so it’s best to start high and reduce until lines look natural.
- Samsung, Vizio, TCL, Hisense, and LG typically have a recommended sharpness setting of ‘0’, while Sony’s is ’50’.
STEP 6 Color and Tint Settings
- The color setting adjusts saturation, and tint controls the red-green balance.
- These are usually accurate by default, especially in Movie or Custom modes, so adjustments are rarely needed.
- Patterns and calibration patterns can be used to help fine-tune the image in order to obtain the best performance. Dolby Vision, a powerful HDR (High Dynamic Range) format, is a great example of how patterns and calibration patterns can improve the TV viewing experience.
STEP 7 White Balance and Color Space

- White balance fine-tunes the color temperature across different shades of grey.
- This is complex and requires specialized equipment, so it’s not recommended for DIY calibration.
Other Considerations
- Color temperature: A warm setting is often recommended for a natural look.
- HDMI Black Levels: Ensure your TV and source device match to avoid poor black representation.
- Dynamic contrast and local dimming: These can be adjusted to personal preference, but turning off dynamic contrast is generally recommended.
- Motion interpolation: Turn this on or off based on whether you like the ‘soap opera effect’.
- Noise reduction: Useful for low-quality content but should be turned off for high-definition sources.
Professional Help
- There are professional calibration services that’ll help you calibrate your TV.
- Consider using a colorimeter.
Demonstrating TV Calibration
Check out the following video for a thorough visual demonstration of how to calibrate either your TV or monitor.
Now you’ve have successfully calibrated your TV for a much better picture quality. Following TV calibration, if you’re still not happy with the picture, we can help you with other smart TV tips.
After calibrating your TV for the best picture quality, you might want to personalize other aspects of your TV experience, such as connecting it to your home network for smart features. This requires you to know your TV’s MAC address, which is a unique identifier for your device on the network.