Are you looking to upgrade your car’s top-rated speakers with a stereo amplifier and considering Bi-amping your factory stereo for a better sound level? It’s simpler than you might think to wire your speakers to an amp.
Key Takeaways_
- This process involves running the amp’s output wires, ensuring proper power output, to the speaker wires on your stereo’s adapter harness, including the center and the leftmost and rightmost speakers in your lounge room speakers setup.
- In a typical 4-speaker system, which might include a 4-channel amp for more separate volume controls, you’d make eight connections – a positive and negative wire for each speaker.
- The technology may differ based on your car model, so getting some advice from an audio electrician could be helpful.
STEP 1 Turning Off and Disconnecting the Amp
Before you begin, it’s essential to ensure the safety of both your audio equipment and yourself. Turn off your sound system and disconnect any power sources connected to your stereo receiver or amplifier.
STEP 2 Identifying the Positive and Negative Wires
Each speaker wire consists of a positive and a negative terminal. Identifying these terminals is crucial to ensure the correct wiring of your speaker systems. Remember, the positive terminal is typically red and the negative terminal is typically black.
Look for specific indicators to tell which wire is positive and which is negative:
- A notable line or series of dashes = positive lead
- Red wire or a color different from the negative wire = positive lead
warning
Wiring your speakers “out of phase” (negative to positive, positive to negative) can cause a significant loss in sound quality.
Note: Not all speaker cables come with standard color coding. When dealing with such a case, observe the insulation of the wire – the stripe or dash are different colors depending on the insulation’s color. If you’re uncertain, it’s advisable to get professional help or consult your Amplifier Installation Guide.
STEP 3 Stripping the Speaker Wire
Strip off approximately 1/2 inch to 3/4 inches of the speaker wire’s insulation at the ends using the appropriate tool. This exposes the bare wire that’ll make the connection to the amplifier’s terminals.
insider tip
If you are working with bare speaker wire ends, make sure you twist the end, wrapping them tightly together, before inserting it into the terminal.
STEP 4 Inserting the Speaker Wire into the Amp’s Terminals
You’re ready to connect your speaker wires to your amp. Run the bare end of the positive speaker wire to the positive terminal on the amplifier, and the bare end of the negative speaker wire to the amplifier’s negative terminal. Always maintain consistent wiring polarity across your entire speaker system.
STEP 5 Tightening the Terminals
Once all connections have been made and you’re confident they’re correct, securely tighten the terminal screws enclosing the bare speaker wire ends.
STEP 6 Connecting Multiple Speakers to the Amp
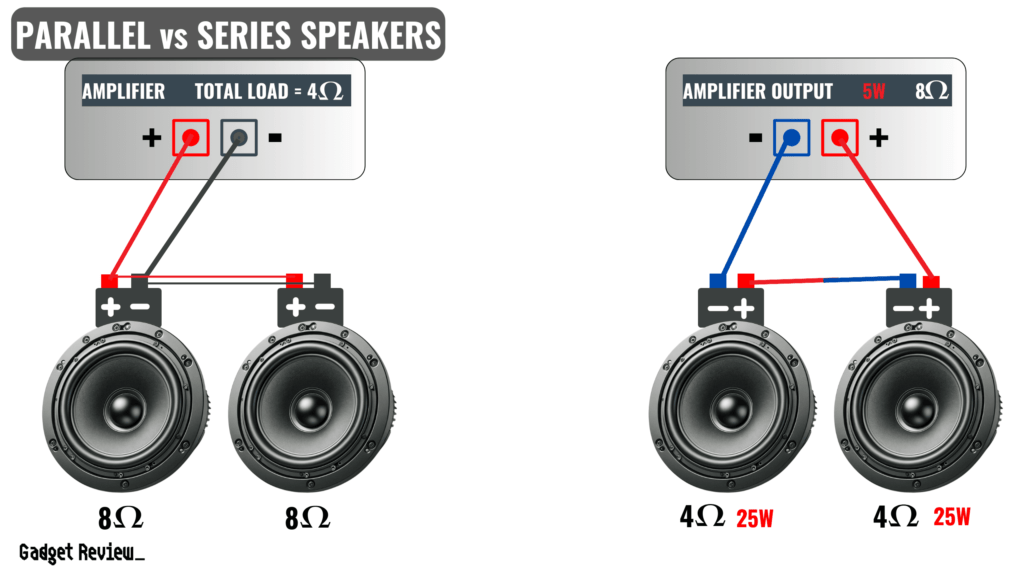
If you’re planning to connect multiple speakers or subwoofers to your amp, you’ll need to consider the amp load of each additional unit. There are more than one configuration to wire multiple sets of speakers:
- Parallel Wiring: All the positive terminals on the speakers are connected together, and all the negative terminals are connected together.
- Series Wiring: Successive speakers are hooked into each other: the positive clip of one speaker is connected to the negative clip of the next one.
- Series/Parallel Wiring: A combination of the previous wiring setups is used to achieve the desired impedance.
Take note, while speaker selectors and impedance matching transformers may be used, they’re often deemed as last resorts and are best overseen by a professional.
STAT: Running speakers in series increases impedance, which decreases the flow of electrical current. (source)
And there you go. The process of connecting speaker wires to an amplifier isn’t as complex as it looks, especially once you’ve got the basics down. The key is to be organized, pay attention to the details, and follow the steps carefully. Now, enjoy the improved quality of your car’s audio system. The next section will cover matching the amplifier power to your speaker’s input power.
STEP 7 Playing Audio through the Speakers
Now comes the fun part: hitting the play button! There’s no better way to test the new connection than to experience the sound firsthand.
Turn on your car or home audio system just like you normally would. Then try playing some tunes through the speakers. Make sure you choose a song with varied sound frequencies- someone with high notes, low beats, and all in between. This will test the capabilities of different sets of speakers and audio signal pathways.
If you can’t hear a difference, cross-verify everything. Make sure all positive and negative terminals are securely attached and that polarity is maintained across all speaker cables. Keep in mind that swapping the positive and negative signals can negatively impact the system’s performance. It’s a detail you don’t want to mess up.
STEP 8 Checking for Proper Sound Quality
After successful testing of the music playback, remember, it’s not only about sound output but sound quality as well. Listen closely: does the sound seem separated in a good way? You should be able to distinguish different instruments if you’re playing a band’s music.
Does the bass seem right? A proper speaker to amplifier connection should be able to produce low frequencies accurately. If you’ve connected subwoofers, you should feel the beats, not just hear them.
If you’re not satisfied with the result or don’t notice the difference, that doesn’t necessarily mean your installation went wrong. There are many possible reasons for this – including your audio system’s overall quality or the quality of the audio files you’re testing with.
In case of any uncertainties, don’t hesitate to ask for professional help. They can carefully examine your setup, ensuring all your speaker terminals, wires, stereo receiver settings and loads are appropriately configured for an optimal sound experience. Remember, the key is to aim for proper speaker systems installation, not just connection.
Selecting the Right Speaker Wire
The quality of your sound system primarily depends on the speaker wire you use. Selecting the right speaker wire is a crucial step in setting up your car sound system. The property, length, and type all matter when it comes to wiring your speakers to the amplifier.
Gauge of the Speaker Wire
The gauge or thickness of your speaker wire is one aspect that will determine the overall sound quality, especially if the amplifier has an output of more than 75 watts RMS per channel. Here, it might be better to run new 14 or 16-gauge speaker wires from the amp to each speaker.
Considering the amps and speakers in series, it is imperative to know that thicker wire (lower gauge) will provide a better audio signal. You can picture it as a larger pipe allowing more water flow. The larger the pipe (lower gauge), the more audio signal (sound) can flow to your speakers.
The gauge also affects the load on your stereo receiver or amplifier. Wire that’s too thin can add to the load, making your amp work harder and potentially affecting sound quality.
Length of the Speaker Wire
The length of wire you will need depends largely on the configuration of your vehicle and your amplifier and speaker placement. For instance, if sound system components are situated at the front and back of your vehicle, you’ll need a longer length of wire. Therefore, ensure to measure accurately before shopping for your speaker wire.
One key tip is to purchase several lengths of speaker wire as these connect your car speakers to the newly installed amp. Make sure to keep speaker wire lengths as short as possible. Remember that longer wire runs require thicker wire (lower gauge) to maintain sound integrity over distance.
Type of Speaker Wire
The type of speaker wire you’ll need largely depends on the intended use and the connections available on your amplifier and speakers. For this process, the recommended type is a four-speaker mono/stereo.
Alternatively, you could opt for highly conductive pure copper speaker wire, which is available by the foot if you don’t want the 9-wire all-in-one solution.
Likewise, you must choose the right speaker wire connectors, such as crimp-type connectors, which are sold in standard colors for the speaker wire gauge they fit. Such connectors are a reliable option and make all the speaker connections without having to solder anything.
Though this is the commonly preferred type, you should also remember that technology may differ according to your car model. Hence, it’s always recommended to take advice from an audio electrician, who can recommend the most suitable type for your vehicle.
Conclusion
You’ve now got the knowledge to wire your speaker to an amp confidently. Remember, safety first – always turn off your system before you start. Identifying positive and negative wires is crucial, and so is maintaining a consistent wiring polarity. If standard color coding isn’t there, don’t worry – you’ve got tips to handle that. Stripping the wire and inserting it into the amp’s terminals is no longer a mystery.
And if you’re dealing with multiple speakers or subwoofers, you know how to consider amp load and wiring configurations. Once you’re done, testing your speaker connection is key. One method is to test the speakers with a multimeter. Good sound quality indicates success. But if something doesn’t feel right, like if you notice there’s white noise in your speakers, you can either resolve it on your own or seek professional help. And remember, matching your amp power to your speaker’s input power is your next step. You’re well on your way to an outstanding audio experience.

